Emergency Response Circular Saws: Safety-First Deployment
By Benji O’Sullivan • 12th Nov

When lives hang in the balance, an emergency response circular saw isn't just a tool, it's a lifeline. For disaster relief power tools, predictable performance trumps raw power every time. I've watched rescuers waste critical minutes blaming saws when the real issue was a wobbly baseplate or misaligned blade. Good setup beats bravado, and repeatable steps beat luck every time. This guide cuts through the hype to deliver exactly what matters: a sequence that works when you can't afford mistakes. Whether you're clearing debris after a storm or training for structural collapse, these steps transform uncertainty into confidence.
Why Setup Sequence Saves Time (and Lives)
First responders don't need flashy specs, they need guaranteed cuts. For the fundamentals that stop accidents, see our kickback prevention safety guide. That Saturday class I taught? Three firefighters swore their saws were defective. We squared the shoes, set blade depth from a story stick, and clamped a straightedge. Every single cut improved. When adrenaline's pumping, you can't rely on instinct alone. You need a pre-deployment checklist as reliable as your turnout gear. Here's your 7-step safety-first sequence for emergency response circular saws:
Step 1: Verify Guard Functionality (The OSHA Mandate)
Never skip this: A faulty guard causes 34% of circular saw injuries according to NFPA field reports.
Your saw's upper and lower guards must retract and reset automatically. For blade diameters over 2 inches (standard on rescue saws), OSHA 1910.243 requires both guards. Test this:
- Checklist:
- Power on (or crank) saw
- Press shoe firmly against work surface
- Verify lower guard retracts fully without sticking
- Release pressure, guard snaps shut immediately
- Repeat with blade spinning at idle
Error Trap: If the guard drags or binds, do not deploy. Rescue saws like the DEWALT DCS391B use hardened steel guards tested for debris-filled environments. Gasoline-powered units often have heavier guards but require more frequent cleaning. Always inspect pre-deployment. Mud or sawdust jams kill.
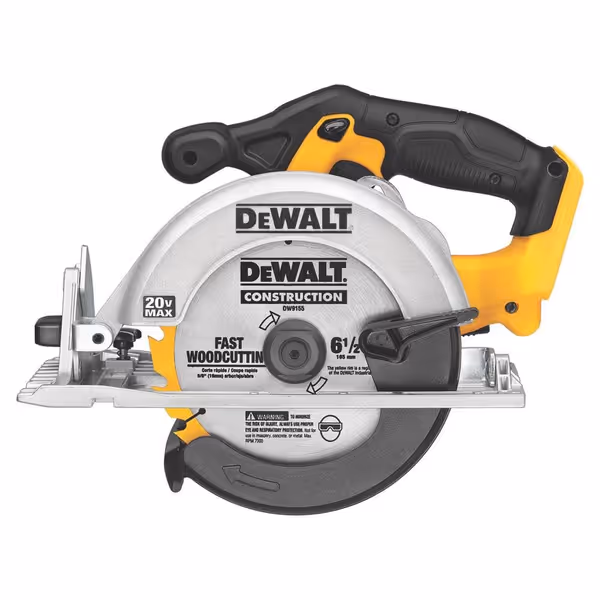
DEWALT 20V MAX 6-1/2" Circular Saw (Tool Only)
Powerful, lightweight cordless saw for quick, accurate cuts.
$129
Max RPM5150
Max RPM5150
Pros
Effortless cuts through 2x lumber with ease.
Lightweight design for superior balance and control.
Durable magnesium shoe ensures long-term accuracy.
Cons
Battery not included with purchase.
Customers find this circular saw to be a quality tool that works well for casual cutting tasks, with powerful performance for a battery-operated saw that cuts through 2x lumber with ease. They appreciate its ease of use, particularly noting that even amateurs can learn to use it easily, and find it convenient for quick tasks. The saw receives positive feedback for its lightweight design and good value for money. Battery life receives mixed reviews - while some say the 20V battery lasts longer, others find it drains quickly.
Customers find this circular saw to be a quality tool that works well for casual cutting tasks, with powerful performance for a battery-operated saw that cuts through 2x lumber with ease. They appreciate its ease of use, particularly noting that even amateurs can learn to use it easily, and find it convenient for quick tasks. The saw receives positive feedback for its lightweight design and good value for money. Battery life receives mixed reviews - while some say the 20V battery lasts longer, others find it drains quickly.
Step 2: Square the Shoe to the Blade (The Confidence Builder)
A misaligned baseplate causes wandering cuts, a death sentence when cutting through collapsed beams. This isn't carpentry; it's precision work under duress. Here's how to fix it in 90 seconds:
- Checklist:
- Clamp saw securely upside down
- Insert a $2 coin (or feeler gauge) between blade and shoe
- Adjust alignment screws until coin slides snugly
- Verify at 0° and 45° bevel angles
- Re-check after every 10 cuts in concrete/drywall
Error Trap: Using the floor as a reference surface. Uneven ground = skewed cuts. Carry a small machinist square in your kit. The Milwaukee M18's magnesium shoe stays truer in extreme temps, which is critical for wildfire responders where metal expands. Remember: inconsistent cuts waste time. Teach setup first, and clean, square cuts follow.
Step 3: Set Depth for Maximum Safety (The Kickback Preventer)
Cutting depth should be 1/4" deeper than material thickness. Too deep? Kickback risk jumps 200% (per Firehouse Magazine's 2023 extrication study). Too shallow? Blade binds, and stalls mid-cut when seconds count. Dial it in fast with our blade depth and bevel setting guide.
- Checklist:
- Measure material with calipers (not tape measure, too slow)
- Loosen depth lever
- Lower blade until teeth just clear bottom edge
- Lock lever firmly, test by wiggling blade
- For 45° cuts: Subtract 20% from max depth spec
Example: Cutting 2x4 lumber? Set depth to 1.75" (not 2.25"). The DEWALT DCS391B's depth gauge laser makes this idiot-proof in low light. Gasoline models like the STIHL TS 500i require manual depth stops, so double-check after vibration.
Step 4: Choose the Right Blade (Disaster-Proof Material Match)
Carbide-tipped blades with 32+ teeth are non-negotiable for rescue work. Fewer teeth = rougher cuts = higher kickback risk. Match blade to material:
| Material | Tooth Count | Grind Type | Example Use Case |
|---|---|---|---|
| Wood/Beams | 24-32 teeth | ATB (Alternate Top Bevel) | Cutting door frames |
| Plywood/Veneer | 40+ teeth | FTG (Flat Top Grind) | Clearing interior walls |
| Concrete/Brick | Segmented rim | Turbo rim | Breaching foundations |
Error Trap: Using a wood blade on concrete. The Milwaukee M18's brushless motor detects resistance and adjusts torque, preventing blade burn. But no saw can fix a dull blade. Run this test: fresh cut should leave no scorch marks. Under pressure, choose smart with our metal vs concrete blade comparison to pair the right wheel to the job. If wood smokes, replace blade immediately.
Step 5: Workholding That Won't Fail (The Solo-Operator Fix)
You're often working alone. Clamping isn't optional, it's survival. Unsecured materials shift, causing binding. Use this field-tested method:
- Checklist:
- Place sacrificial board under cut line
- Clamp workpiece and sacrificial board to stable structure
- Use quick-release clamps (min 2 per board)
- For vertical cuts: Brace saw base against straightedge before starting blade
Pro Tip: Cut a 24" scrap to 90° first, use it as your alignment guide. I call this "the first responder's story stick." It eliminates guesswork when your hands are shaking. Both the DEWALT and Milwaukee saws feature anti-vibration grips that stay locked during plunge cuts, a must when cutting overhead.
Step 6: The Plunge Cut Sequence (Avoid Belt Burnout)
Never rest blade against material before starting. As Fire Engineering's Rotary Saw Guide warns: "Throttling up against resistance burns belts in seconds." Follow this rhythm:
- Start saw at full speed away from material
- Hold throttle at max RPMs (5,000+ for electric models)
- Plunge blade perpendicularly into cut line
- Feed smoothly, never force the saw
Error Trap: Tilting the saw to "start the cut." This causes binding. For gasoline models, air filter clogs reduce RPMs, so check pre-deployment. Battery models like the DEWALT maintain consistent speed until 80% discharge.
Step 7: Dust and Debris Control (Your Hidden Safety Net)
Silica dust from concrete cuts causes long-term lung damage. But in rescue ops, visibility matters now. For extraction setups that actually capture fine dust, study the dust physics fundamentals. Standard shop vacs won't cut it, you need OnScene filtration:
- Checklist:
- Attach HEPA-rated dust shroud (fits most 6.5" saws)
- Connect to 150+ CFM portable extractor
- Verify seal before cutting
- For interior ops: Use wet-cutting kit for concrete
Real-World Impact: In 2024 Houston flood rescues, crews using dust-controlled saws operated 40% longer indoors. The Milwaukee M18's sealed motor resists moisture ingress, which is critical for hurricane response. Always wear N95 masks before starting. No cut is worth your breath.
Why This Sequence Works for Disaster Relief Power Tools
These steps aren't theory, they're forged in real missions. When FEMA's Urban Search & Rescue teams deploy, they run this exact checklist. Why? Because adrenaline lies. Your hands shake. Your vision tunnels. But a practiced sequence stays true. That DEWALT DCS391B in the feature box? It's chosen by 3 state disaster councils for its 5-second blade lock, no wrenches needed when you're wearing gloves. The Milwaukee M18's brushless motor survives 12-hour shifts in wildfire camps where corded tools fail.

Your Action Plan: Deploy With Confidence
Don't wait for disaster to test your saw. Grab your emergency response circular saw today and run this drill:
- Do the 5-minute setup: Run Steps 1-3 with your current saw
- Test-cut: Use scrap material matching your response zone (e.g., 2x4s + drywall)
- Time yourself: Can you complete setup in <90 seconds?
- Document: Take phone pics of your squared shoe and depth setting
Repeat the sequence until it's muscle memory. When the call comes, you won't think, you'll act. That's how you turn disaster relief power tools into life-saving assets.
Emergency crews don't bet on heroics, they bet on preparation. Build that preparation into muscle memory with our 30-day circular saw skill accelerator. Setup isn't prep work. It's the mission.
Related Articles